Archive for the 'PowerShell' Category

Fixing “Debug adapter process has terminated unexpectedly” error in VSCode for PowerShell

VSCode is the primary tool that Microsoft provides on Linux and Mac OS to edit and debug PowerShell scripts. Yet, on MacOS, with default installation, you are likely to get the “Debug adapter process has terminated unexpectedly” when you try running your scripts.

However, to fix this issue you simply need to install OpenSSL on your Mac running VSCode as described here.

Once this is done, simply:

  1. Click File / Open and open the folder containing the PowerShell script,
  2. Click the script that you want to edit in the left-hand pane,
  3. Set breakpoints where you want them by clicking on the margin by the corresponding script line,
  4. Press F5 or click the run button in the editor:

Debugging PowerShell scripts on Mac OS X in VSCode

Happy scripting!

Enabling Intellisense for PowerShell cmdlets in VSCode on Mac OS X

VSCode is the primary way to edit and debug PowerShell scripts on Mac OS and Linux. If you do not have it yet, follow these instructions on GitHub on installing VSCode on Mac OS/Linux/Windows and adding its PowerShell extension.

Once you are done with that, you can create a new or open an existing PS1 file, however, you might still get “No suggestions” error when you try to get intellisense for cmdlets:

VSCode on Mac no suggestions

This is because this functionality actually requires OpenSSL. Here’s how you add it to your system:

Install Homebrew

Homebrew is Mac’s most popular package manager. To install it:

  1. Open a Terminal window,
  2. Install Mac OS command-line developer tools (xcode) by pasting the following command and pressing Enter:
    xcode-select --install

    Install Mac OS command-line developer tools xcode
  3. Install Homebrew package manager by pasting the following command:
    ruby -e "$(curl -fsSL https://raw.githubusercontent.com/Homebrew/install/master/install)"
    Installing Homebrew Mac OS package manager
  4. Double-check that the installation is successful by running

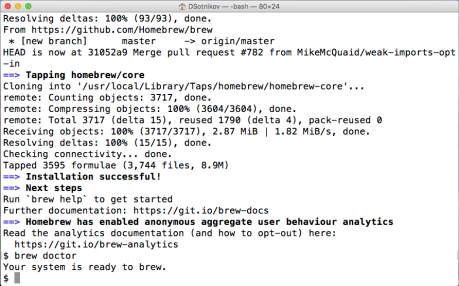
    brew doctor

    System ready to brew

Install OpenSSL

Now install OpenSSL on Mac OS by simply pasting the following command to the Terminal window:

brew install openssl

 Install openssl on Mac OS X with homebrew

Verify PowerShell cmdlet intellisense in VSCode

  1. Start VSCode,
  2. Open a ps1 file or save the file that you have as .ps1,
  3. Verify that PowerShell is selected as the language mode at the bottom right of the VSCode window:PowerShell language mode in VSCode
  4. Type Get- and you will see the intellisense window popping up with the list of available Get- cmdlets:VSCode with intellisense for PowerShell cmdlets

Run PowerShell on Mac OS X

As you have probably heard by now, Microsoft has just open-sourced PowerShell and made it available for Linux and Mac OS X. In this blog post, I will take you through the steps to download, install and run PowerShell on a Mac.

Download and Install PowerShell for Mac OX

  1. Go to PowerShell github project: https://github.com/PowerShell/PowerShell
  2. Scroll down to the Get PowerShell section and download .pkg:

Download OS X pkg file for PowerShell

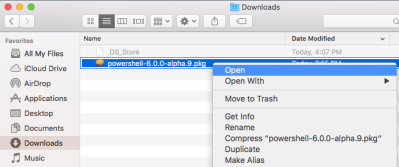
3. Locate the newly downloaded file in Downloads, right-click it and click Open:

Install PowerShell pkg on Mac OS X

4. You will be warned that this is a file from the Internet and then prompted for your local administrative password, then go through the installation wizard.

Run PowerShell on Mac OS X

PowerShell is a command-prompt in your terminal window, so to start it:

  1. Start the Terminal application,
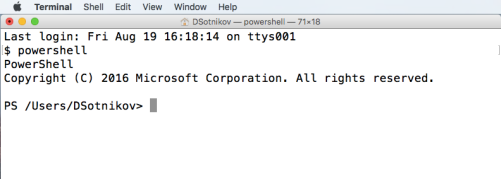
  2. Now you can simply type powershell as a command and this will start the PowerShell engine and move you from the bash prompt ($) to the PowerShell prompt (PS):
    Starting PowerShell prompt on Mac OS X in bash Terminal

  3. That is it! You can now type a PowerShell command and see the output. For example, here’s Get-Process:
    Get-Process powershell command on Mac OS X

If you are new to PowerShell, see the Learning PowerShell page on GitHub.

Download Links for PowerGUI and QAD cmdlets

powergui logoWith Dell’s acquisition of Quest and all the IT reorganization that followed, it is actually not that easy to find these two popular free PowerShell tools any longer. So here are the links that work today (January 30, 2015):

PowerGUI

The download is freely available from Dell’s PowerGUI community.

The community itself also got moved from http://powergui.org to http://en.community.dell.com/techcenter/powergui.

Dell Software is still maintaining the product – as I am writing this the latest version is 3.8 released in April 2014.

UPDATE: Looks like Dell took the community site down but direct download link http://community-downloads.quest.com/powergui/Release/3.8/PowerGUI.3.8.0.129.msi still works.

Quest / QAD cmdlets

This one is a little more tricky to find: https://software.dell.com/register/71110

If this link for some reason changes, all Dell’s freeware and trial links can be found in this catalog: http://software.dell.com/trials/

UPDATE: Looks like this got hidden even further. Not sure where it can be found now. This site seems to have copied and made them available for download though: http://www.powershelladmin.com/wiki/Quest_ActiveRoles_Management_Shell_Download

Happy PowerShelling!

Website scraping to PowerShell module

I have not tried this one myself, but I have to admit: this Gargl video on turning Yahoo search site into a PowerShell module looks pretty cool:

See Joe’s blog post for details and download links.

Just Script It!

Here’s Sean’s newest crazy PowerShell video in which he managed to feature your’s truly doing moonwalk (or trying to ;))

As you can see from the video – Microsoft MVP Summits are a lot of fun with amazingly smart and crazy people around.

No more one off IT management. Just Script It!

PowerShell script to set Skype status text to latest blog or twitter update

In my current company (Jelastic) we have something happening to us all the time: latest blog posts, awards, media mentions, etc. We are doing a decent job pushing these to various social media, but I also wanted to get these to my contacts in Skype (Skype gives you the ability to set your status text in your profile).

Below is the PowerShell v3 script that I wrote today to do that! 🙂

It takes the latest item from my blog and twitter feed, sees which of them is fresher, and (unless the tweet is just my reply to someone) pushes that to Skype (the property is called MoodText).

Here’s the script:

###################################################
# Set-SkypeStatusText.ps1
# Gets latest post from RSS feed (e.g. blog) and Twitter
# Picks whichever is the latest and sets it as status text (MoodText) in Skype
# (unless the latest tweet is a reply)
#
# NOTE: On x64 boxes, use PowerShell x86 (for Skype compat)
#
##################################################
# (c) 2012 - Dmitry Sotnikov
##################################################

# Customize these for yourself
$myblog = "http://blog.jelastic.com/feed/"
$myTwitterHandle = "DSotnikov"

# Get the blog feed
$blogFeed = Invoke-RestMethod $myblog

# Get the twitter feed
$twitterFeed = Invoke-RestMethod `
"https://api.twitter.com/1/statuses/user_timeline.rss?screen_name=$myTwitterHandle"


# If twitter is more recent and not a reply (does not start with @) use it
if (($twitterFeed[0].pubDate -gt $blogFeed[0].pubDate) -and
($twitterFeed[0].description[$myTwitterHandle.Length+2] -ne "@")){
$latestPost = $twitterFeed[0].description.Substring($myTwitterHandle.Length+2)
} else {
$latestPost = "$($blogFeed.Item(0).title): $($blogFeed.Item(0).link)"
}

# Set the status in twitter
$skype = New-Object -ComObject Skype4Com.Skype
$skype.CurrentUserProfile.MoodText = $latestPost

Now if you want to have this happen automatically you can just schedule it using Windows Task Scheduler.

Important:

  • Make sure that you use 32-bit (x86) version of PowerShell if you are on 64-bit Windows – otherwise Skype object will not get found (so the filepath for the Windows task on x64 Windows will likely be %SystemRoot%\syswow64\WindowsPowerShell\v1.0\powershell.exe)
  • Either sign your script or set ExecutionPolicy to RemoteSigned – otherwise the script execution will fail.

New in PowerShell 3: Parse HTML without IE object (unless a local file)

Remember how in PowerShell v1 and v2 we used to have to create Internet Explorer object each time we wanted to parse HTML page? This kind of works but has a few inconveniences such as having to insert Start-Sleep every now and then because IE can be busy and fail if you request too much from it too quickly.

In PowerShell v3, for web pages, things become much easier. Just do:

$p = Invoke-WebRequest "https://dmitrysotnikov.wordpress.com"

And $p.ParsedHtml.body will let you iterate though all web page elements!

However, there is a scenario in which you will have to revert to the old IE ways – local files. If the HTML file is on your local disk, $p will not have the ParsedHtml property. And you will have to use the IE COM object like you did in earlier versions of PowerShell:

$ie = new-object -com "InternetExplorer.Application"
# The easiest way to accomodate for slowness of IE
Start-Sleep -Seconds 1
$ie.Navigate("D:\SavedPage.htm")
# The easiest way to accomodate for slowness of IE
Start-Sleep -Seconds 1
$ParsedHtml = $ie.Document

Happy scripting!

Video: Brandon Shell – Module Design for IT Pro

Here’s another great recording from previous PowerShell Deep Dive – Brandon‘s session on module design. Brandon has experience designing PowerShell modules for Splunk and other companies – so there’s a lot to learn from him!

In this session we will deep dive into the thought process behind production module design. The presenter will explain the reason for choices made for the Splunk Module and his own BSonPosh module.

This is a live recording from European TEC 2011 PowerShell Deep Dive conference. See more PowerShell Deep Dive recordings here.

By the way, TEC US is just around the corner – April 29 – May 2, 2012 in San DiegoThe agenda has already been published and is absolutely fantastic.

Register now – this is the best PowerShell event you can find!

Parsing LinkedIn html pages with PowerShell

A couple of weeks ago we posted a job opening on LinkedIn (were looking for a person to be in charge of our Jelastic‘s professional services), and it turned out that while LinkedIn jobs attract a lot of applications, the site itself does not make it easy to process them afterwards. You get CVs in email, and they also post a list of applicants with email addresses, phone numbers, titles, etc. – but there is no way to export the list to, say, Excel. In our case, we really wanted to have the data exported, so we could jointly work on a shared spreadsheet and everyone involved could grade each applicant and add notes to the table.

Being a PowerShell guy, I wrote the script below that does the scraping for me. 🙂 Basically, I just saved the page with the list of applicants to my local disk and found that in their html, each applicant information is contained in vcard element, which has class name with LinkedIn URL and the actual name, and then elements with email and phone number:

So all my script has to do is: create an IE object and then use it to find the corresponding fields, then create custom objects from them, add them to the collection, and export it to CSV. Here’s the code – hope it helps you solve similar tasks when other sites do not provide good export capabilities:

$ie = new-object -com "InternetExplorer.Application"

# The easiest way to accomodate for slowness of IE
Start-Sleep -Seconds 1

$ie.Navigate("D:\Temp\LinkedIn.htm")

# The easiest way to accomodate for slowness of IE
Start-Sleep -Seconds 1

$doc = $ie.Document

# Get a collection of vcard elements
$cards = $doc.body.getElementsByClassName("vcard")

# This will be our collection of parsed objects
$processesCards = @()

# Iterate through the collection
for ($i=0; $i -lt $cards.length; $i++) {

 $itm = $cards.item($i)

 # Get the 'name' element that has the applicant name and URL
 $name = $itm.getElementsByClassName("name").item(0).
                       getElementsByTagName("a").item(0)

 # If you want you can output the name to the screen 
 # so you know where you are
 $name.outerText

 # Get the phone number and email address
 $phone = $itm.getElementsByClassName("phone").item(0)
 $email = `
   $itm.getElementsByClassName("trk-applicant-email").item(0)

 # Below is PowerShell v3 notation. 
 # In v2, replace '[pscustomobject]' with 
 # 'new-object psobject -Property' 
 $obj = [pscustomobject] @{"name"=$name.outerText; 
                           "url"=$name.href; 
                           "email"=$email.outerText; 
                           "phone"= $phone.outerText }

 $processesCards += $obj

}

# Export to CSV - which you can open in Excel
$processesCards | Export-Csv D:\Temp\linkedin.csv 

Legal

The posts on this blog are provided “as is” with no warranties and confer no rights. The opinions expressed on this site are mine and mine alone, and do not necessarily represent those of my employer - WSO2 or anyone else for that matter. All trademarks acknowledged.

© 2007-2014 Dmitry Sotnikov

May 2024
M T W T F S S
 12345
6789101112
13141516171819
20212223242526
2728293031